How to Create Custom DialogBox using JQuery
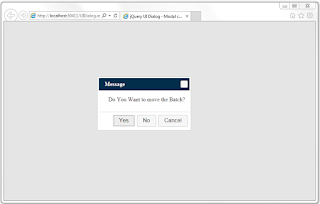
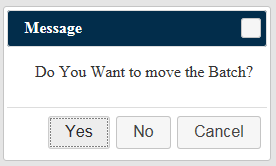
Example: In this application I will show you how to create Dialog box using JQuery.
Mostly we use JavaScript Default confirmation box for yes or no options.But we can't add another option into that Default Confirmation box in that requirement we want to create custom Dialog box.
For my requirement I need three button Yes,No and Cancel Options in Dialog Box.
Lets see how it possible with JQuery
1. Create a new webform with the name of 'UIDialog.aspx'.
2. Add a JQuery and Css plugins for custom Dialog Box below head tag. Please see in code.
3. Create a function in that I have three buttons in aspx page. Please see below code.
<head runat="server">
<meta name="viewport" content="width=device-width, initial-scale=1">
<title>jQuery UI Dialog - Modal confirmation</title>
<link href="Css/styles.css" rel="stylesheet" type="text/css" />
<script type="text/javascript" src="https://code.jquery.com/jquery-1.12.4.js"></script>
<script type="text/javascript" src="https://code.jquery.com/ui/1.12.0/jquery-ui.js"></script>
<script type="text/javascript">
$(function () {
$("#dialog-confirm").dialog({
resizable: false,
height: 155,
width: 260,
modal: true,
buttons: {
"Yes": function () {
// Your Code Here
$(this).dialog("close");
alert('U have Selected Yes');
},
"No": function () {
// Your Code Here
$(this).dialog("close");
alert('U have Selected No');
},
"Cancel": function () {
// Your Code Here
$(this).dialog("close");
}
}
});
});
</script>
</head>
4. Create a div with the name of 'dialog-confirm' and insert some text in the span .Please See code below.
<div id="dialog-confirm" title="Message">
<p>
<span class="ui-icon ui-icon-alert" style="float: left; margin: 12px 12px 20px 0;">
</span>Do You Want to move the Batch?</p>
</div>
5. In this Custom Dialog Box we need Css File and Jquery plugins. Already I have mentioned Jquery Plugins in my code and for Css File we have to check this link and complete code will copy and paste to your new css file and customize the settings for your requirement.By Clicking this Link You Can Get the Code of Css
6. Please See the Complete Code.
<%@ Page Language="C#" AutoEventWireup="true" CodeBehind="UIDialog.aspx.cs" Inherits="JqueryDialogBoxExample.UIDialog" %>
<!DOCTYPE html PUBLIC "-//W3C//DTD XHTML 1.0 Transitional//EN" "http://www.w3.org/TR/xhtml1/DTD/xhtml1-transitional.dtd">
<html xmlns="http://www.w3.org/1999/xhtml">
<head runat="server">
<meta name="viewport" content="width=device-width, initial-scale=1">
<title>jQuery UI Dialog - Modal confirmation</title>
<link href="Css/styles.css" rel="stylesheet" type="text/css" />
<script type="text/javascript" src="https://code.jquery.com/jquery-1.12.4.js"></script>
<script type="text/javascript" src="https://code.jquery.com/ui/1.12.0/jquery-ui.js"></script>
<script type="text/javascript">
$(function () {
$("#dialog-confirm").dialog({
resizable: false,
height: 155,
width: 260,
modal: true,
buttons: {
"Yes": function () {
$(this).dialog("close");
alert('U have Selected Yes');
},
"No": function () {
$(this).dialog("close");
alert('U have Selected No');
},
"Cancel": function () {
$(this).dialog("close");
}
}
});
});
</script>
</head>
<body>
<form id="form1" runat="server">
<div id="dialog-confirm" title="Message">
<p>
<span class="ui-icon ui-icon-alert" style="float: left; margin: 12px 12px 20px 0;">
</span>Do You Want to move the Batch?</p>
</div>
</body>
</html>


Comments
Post a Comment